Table of Contents
ToggleThe Graphorn stands as one of Hogwarts Legacy’s most formidable and elusive creatures, a spiky, aggressive beast that demands respect and preparation before you even think about facing it. If you’ve been wandering the Highlands searching for this legendary creature or wondering whether the hunt is actually worth your time, you’re not alone. Players often overlook the Graphorn in favor of more accessible magical companions, but taming one transforms your entire gameplay experience. This guide breaks down everything you need to know: where to find the Graphorn, how to successfully tame it without dying repeatedly, what abilities make it special, and how to maximize its potential once it’s yours. Whether you’re a completionist chasing every beast in the game or someone looking for a genuine combat advantage, understanding the Graphorn location in Hogwarts Legacy and the mechanics behind taming it will set you apart.
Key Takeaways
- The Graphorn in Hogwarts Legacy is a high-damage summon located in the Highlands’ Graphorn Den northeast of Feldcroft Catacomb, requiring level 20+ and proper spell preparation to tame successfully.
- Master distance management and sidestep the Graphorn’s charges during combat to create openings for spellcasting, then initiate the taming sequence once its health drops to approximately 40%.
- Once tamed, your Graphorn serves as both a formidable combat ally that pulls enemy aggro and a traversal tool that unlocks elevated areas and hidden content across the map.
- Synergize crowd-control and area-of-effect spells with your Graphorn’s aggressive attacks for maximum effectiveness, rather than relying on pure damage builds.
- The Graphorn location rewards exploration and patience with a unique playstyle option that transforms creature-focused gameplay into your game’s endgame strategy.
What Is The Graphorn in Hogwarts Legacy?
Graphorn Appearance and Abilities
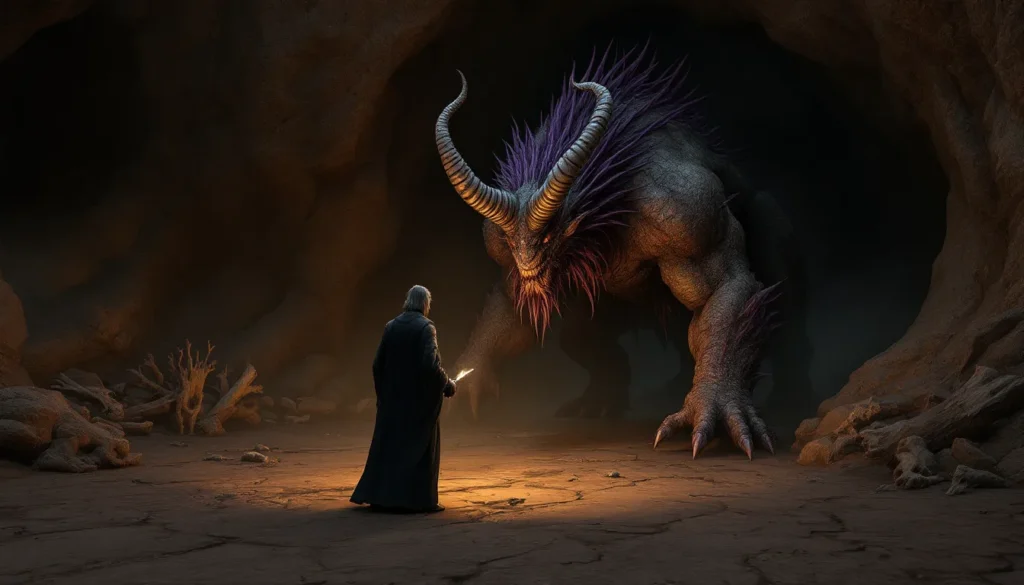
The Graphorn is unmistakable once you lay eyes on it. This massive, aggressive creature resembles a cross between a rhinoceros and a spiky demon, thick, muscular frame covered in jagged purple protrusions that make it look genuinely dangerous. Standing roughly twice the height of your character, the Graphorn commands attention and fear. Its most striking feature is the prominent graphorn horn, a large spiraled point protruding from its head that serves both as a weapon and the creature’s signature trait.
In combat, the Graphorn relies on straightforward but devastating attacks. It charges directly at enemies, rams with its horn, and swipes with impressive reach. What sets it apart from lesser beasts isn’t speed, it’s raw power and aggression. The creature doesn’t telegraph attacks with lengthy animations: it hits fast and hard. Once tamed, your Graphorn retains these aggressive tendencies, making it one of the most offensively-oriented companions in the game. Unlike some creatures that provide balanced benefits, the Graphorn is built for damage and dominance.
The beast’s purple coloration and spiky appearance align with its hostile nature. Avalanche Software intentionally designed the Graphorn to look threatening, and it delivers on that promise. Attempting to approach an untamed Graphorn without proper preparation is a quick path to defeat.
Role in the Game’s Story
The Graphorn doesn’t occupy a central narrative role in Hogwarts Legacy, but its presence threads through the creature-focused side content. You’ll encounter references to it during beast-related quests, and seeking it out ties into the broader theme of magical creature mastery that drives Sebastian Sallow’s character arc. The creature represents a pinnacle of what players can achieve through patience and skill, taming something genuinely dangerous rather than simply befriending docile creatures.
The Graphorn’s rarity in the game world mirrors its difficulty. Unlike the Hippogriff or the Graphorn’s smaller cousins scattered across the map, you won’t stumble onto a tame Graphorn by accident. This deliberate design choice makes acquiring one feel like a genuine accomplishment rather than inevitable progression. The graphorn hogwarts legacy location itself is tucked away in the Highlands, far from the central castle and main questlines, emphasizing that this is optional content for dedicated players.
How to Find and Unlock the Graphorn
Location and Encounter Requirements
Finding the Graphorn requires traveling to the Highlands region, specifically to the area known as the Graphorn Den. The graphorn hogwarts legacy location sits northeast of Feldcroft Catacomb, in a relatively isolated area surrounded by rocky terrain. You can’t miss the den itself once you’re in the vicinity, look for a large cave entrance marked by scattered bones and obvious battle damage. The Graphorn doesn’t roam: it defends its territory aggressively.
Before heading to the Graphorn den hogwarts legacy, confirm your spell loadout is optimized. The creature’s aggressive nature means you’ll need defensive and offensive options. Players often underestimate the importance of preparation and arrive with a haphazard spell selection, which leads to unnecessary deaths.
The graphorn location hogwarts legacy is marked on your map once you’ve discovered it or received information about it. Fast-traveling to nearby points and then approaching on foot gives you the advantage of preparation time. Don’t rush directly at the beast upon arrival: take a moment to understand the terrain and plan your positioning.
Quest Prerequisites and Timing
Unlike some creatures, the Graphorn doesn’t require a specific quest to encounter. But, certain main story progression checkpoints unlock the ability to tame creatures effectively. You’ll want to have completed at least the early-to-mid game main questline, as the taming mechanics aren’t available from the tutorial phase. Most players who attempt the Graphorn are at least character levels 20–30, though the creature itself doesn’t scale, it hits just as hard regardless of your level.
You don’t need to hunt down NPCs for special quests before confronting the Graphorn. The main prerequisite is gear and spell progression. Players with upgraded defensive spells and decent combat experience fare significantly better than those treating it as their first major creature encounter. The timing of when you face the Graphorn is entirely up to you, but rushing in during the early game is a recipe for frustration.
The Complete Taming Process: Step-by-Step Guide
Preparation Before the Encounter
Before stepping foot in the Graphorn den, ensure your spell wheel is loaded with the essentials. You’ll need at least one defensive spell, Protego or Barricade work well, to mitigate damage. Include an offensive spell with decent scaling: Incendio (fire) or Confringo (explosion) pair well with Graphorn encounters. Having at least two healing potions stocked is non-negotiable: underestimate this and you’ll find yourself dead mid-combat with no recovery option.
Gear matters more than many players realize. Equip armor sets with defensive stats rather than pure damage output. The Graphorn deals physical damage, so prioritize mitigation over aggression. Wearing robes with curse resistance or protection against physical damage significantly improves survival rates. Accessories and wand selection matter too: a wand with better spell power or faster cast times reduces time spent vulnerable between attacks.
Before entering the den, you should have completed enough side activities to reach at least character level 20. Players attempting this fight at lower levels spend more time dodging and less time dealing damage, which extends the encounter unnecessarily and increases risk. Stock your inventory with healing items beyond just potions, especially any rare ingredients or special items that restore health.
Combat Strategies and Tips
The Graphorn’s attack pattern revolves around aggressive charging and close-range swipes. It doesn’t cast spells or employ tactics: it simply bludgeons forward. This predictability is your advantage. Distance management is critical, staying too close means you’re in the path of its charges, while being too far means you’re wasting time walking forward and can’t reliably land spells.
Start the encounter by maintaining mid-range positioning. Let the Graphorn charge at you, then sidestep and immediately cast your most damaging spell. The brief window after it charges is your primary opening for damage. Don’t get greedy: land one or two spells, then reposition. Attempting to chain multiple attacks while the creature is recovering often results in eating its next attack.
Use your defensive spell reactively rather than preemptively. Blocking too early wastes mana, but blocking at the last moment before impact negates damage effectively. Practice the timing, it’s the difference between a quick fight and a grinding attrition battle. Some players find it effective to use crowd-control spells like Stupefy or Immobilize early to create distance, then unload damage while the creature is vulnerable.
Never, and this is critical, never back yourself into a corner or against a wall. The Graphorn will trap you and you’ll take consecutive hits with no escape route. Keep the arena open, use terrain to your advantage, and always maintain an avenue for movement.
Successful Taming Mechanics
Once you’ve reduced the Graphorn’s health to approximately 40%, a taming prompt appears on-screen. This isn’t automatic: you must actively initiate the taming sequence by pressing the designated button (varies by platform). Miss this window or fail to reduce its health sufficiently, and you’re back to pure combat.
The taming itself requires completing a simple button sequence. Different platforms use different controls, but console players typically face a Quick Time Event (QTE) demanding precise timing on button presses. PC players might face a different interaction. Regardless of platform, the key is focusing during this moment, there’s no penalty for failure beyond restarting the taming attempt, but missing the sequence multiple times extends the fight unnecessarily.
Once taming completes successfully, the Graphorn becomes yours. You now have access to its abilities and can summon it during exploration and combat. The taming sequence itself takes only a few seconds, so don’t panic if the creature breaks free partway through, you can attempt it again once its health drops sufficiently.
Using Your Graphorn: Abilities and Applications
Combat and Traversal Benefits
Once tamed, your Graphorn becomes a formidable combat ally. Summoning it in battle immediately shifts the dynamics, enemies focusing on you now face competition from your spiky companion. The Graphorn’s primary benefit is raw damage output. It charges enemies, knocks them back, and deals consistent physical damage that stacks with your spellcasting. In group encounters, this multiplier effect turns difficult fights into manageable ones.
Beyond raw combat power, the Graphorn provides traversal advantages. Certain areas of the map contain high ledges or environmental obstacles that are inaccessible to your character alone. Summoning your Graphorn and riding it allows you to reach these elevated positions. This opens new paths, hidden collectibles, and shortcuts that walking players miss entirely. The graphorn hogwarts legacy location itself becomes a jumping-off point for exploration once you understand its traversal utility.
The Graphorn’s aggressive nature means it pulls aggro from multiple enemies effectively. In larger battles, summoning it near a tough enemy or group pulls their attention away from you temporarily, allowing breathing room for healing or repositioning. It’s not a tank in the traditional RPG sense, but it functions as a damage sponge through sheer aggression and health pool.
Integration With Magical Spells and Gear
Your Graphorn works alongside your spellcasting rather than replacing it. The most effective strategy combines your summon’s attacks with well-timed offensive spells. While your Graphorn charges forward, you’re casting from distance, creating a coordinated assault that enemies struggle to handle. This synergy becomes especially powerful in endgame content where individual spell damage isn’t sufficient.
Certain spell choices synergize better with the Graphorn than others. Crowd-control spells like Incarcerous (binding) or Stupefy (stunning) immobilize enemies, allowing your Graphorn to unload damage safely. Area-of-effect spells like Diffindo (slashing) or Bombarda (explosive) damage multiple enemies while your beast focuses single targets. Building your loadout with this synergy in mind transforms the Graphorn from a nice addition to a core strategic component.
Gear choices should emphasize spell power and health regeneration when running with a Graphorn-focused build. Unlike pure damage builds that maximize casting stats, Graphorn builds benefit from utility and sustainability. You’re not trying to one-shot enemies: you’re coordinating sustained pressure with your summon. Accessories that boost summoning cooldown reduction or creature health become valuable, whereas pure damage accessories become redundant.
Common Graphorn Questions and Troubleshooting
Frequently Asked Gameplay Questions
Can I find multiple Graphorns? No. Hogwarts Legacy contains only one tamable Graphorn. Once you’ve tamed it, that’s your only permanent access to the creature. You can’t breed them, find additional specimens, or access a second one through alternate paths.
What level should I be to attempt the Graphorn? Level 20 is the minimum I’d recommend, though level 25+ makes the encounter significantly easier. Below level 20, your spells lack sufficient scaling to deal meaningful damage, and the fight becomes a grinding war of attrition.
How much health does the Graphorn have? The untamed Graphorn has approximately 800–1000 health depending on your damage scaling and difficulty settings. This isn’t a brief skirmish: expect a 5–10 minute fight if you’re appropriately leveled.
Can I actually fail to tame it? Mechanically, no. If you reduce its health to the taming threshold and miss the button prompt, you simply retry the taming sequence. The only real “failure” is dying before reducing its health sufficiently, requiring you to restart the entire fight. Players asking “what if I mess up the taming” can breathe easy, the mechanic is forgiving.
Is the Graphorn worth the effort? That depends on your playstyle. If you enjoy summoning-focused combat and exploring high-difficulty encounters, absolutely. If you prefer pure spellcasting and stealth, the Graphorn is optional. It doesn’t break the game’s difficulty, it enhances it for players who want a summon-based approach. The journey to find and tame it is the real reward for many players, resources from RPG Site often note that creature-focused builds are among the most satisfying playstyles in legacy games.
Known Issues and Solutions
Occasionally, players report the Graphorn becoming stuck in terrain, failing to respond to summon commands, or glitching during the taming sequence. If your tamed Graphorn stops responding to summons, try dismissing it and re-summoning after combat ends. If the creature clips through terrain and becomes unreachable, fast-traveling away from the area and returning often resets its position.
Rare bugs during taming sometimes cause the prompt to fail even after successful button inputs. If this happens, restart the encounter by leaving the den and returning. It’s frustrating, but reloading a pre-encounter save is the most reliable fix. Most players never experience these issues, and patches have addressed the worst offenders since the game’s launch.
If you’re struggling to locate the Graphorn den itself, confirm you’ve discovered the Highlands region fully. The den doesn’t appear on your map as a waypoint initially: you must approach it or receive information about it through exploration. Walking through the area northeast of Feldcroft Catacomb usually triggers discovery.
Maximizing Your Graphorn Experience
Advanced Strategies and Hidden Secrets
Once you’ve tamed your Graphorn, the real optimization begins. Many players treat summons as “drop in, deal damage, dismiss” tools, but the Graphorn rewards more sophisticated tactics. Advanced players use the Graphorn’s aggro pull strategically, positioning themselves in safe zones while enemies cluster around their summon, then unload area-of-effect spells for massive damage.
One hidden benefit involves the Graphorn’s knockback ability during charges. In certain boss fights with environmental hazards, cliffs, falling objects, or damaging floors, strategically triggering your Graphorn’s charge knockback can launch enemies into these hazards for free damage or environmental kills. This technique rarely works in normal encounters but becomes invaluable in endgame challenges.
The creature’s traversal utility extends beyond simple climbing. Certain puzzles in the castle and Highlands contain solutions requiring creature-based traversal. Your Graphorn may unlock paths others miss, leading to hidden chests, rare ingredients, or collectible locations. Exploring thoroughly with your summon active often reveals these secrets. Check online communities and Twinfinite’s guides for specific location breakdowns once you’ve acquired your beast.
Interesting build synergies emerge when combining the Graphorn with specific talent trees. Players investing in summoning-focused talents gain cooldown reduction and increased summon damage, making the Graphorn exponentially stronger. Similarly, ancient magic synergies can amplify your Graphorn’s effectiveness during combat sequences featuring ancient magic.
For hardcore players, attempting late-game dungeons with only your Graphorn as offense (pure support magic) creates an interesting challenge. It’s not necessary for victory, but it showcases the creature’s actual power once you understand how to leverage it. Some players report clearing challenging areas more efficiently with a Graphorn-focused build than pure damage builds, suggesting Avalanche Software balanced the creature thoughtfully.
Experiment with different spell combinations to find what works best with your playstyle. Some players prefer aggressive summon-heavy strategies where they primarily heal and buff their Graphorn. Others use the Graphorn defensively while they handle offense with spellcasting. The most effective approach depends entirely on your gear, talents, and personal preference. Unlike meta-locked competitive games, Hogwarts Legacy rewards creative experimentation. Resources like Game8’s build guides catalog various strategies worth exploring once you’re comfortable with basic Graphorn mechanics.
Conclusion
The Graphorn represents everything Hogwarts Legacy does well: taking an optional challenge and rewarding players with a genuinely powerful tool that changes how you approach the game. The journey to the graphorn den hogwarts legacy, the difficult taming encounter, and the creature’s combat applications create a satisfying gameplay loop. It’s not the easiest creature to acquire, and it’s not mandatory for completing the game, but it’s absolutely worth pursuing if you enjoy creature-focused gameplay or want a meaningful summon companion.
Successfully taming the Graphorn means understanding its location in the Highlands, preparing properly before the encounter, and executing a tactical strategy rather than button-mashing through combat. Once it’s yours, the real work begins, learning to synergize your summon with your spellcasting, discovering traversal routes it uniquely enables, and finding hidden content others overlook. The investment pays dividends throughout your remaining playthrough and in endgame content.
Whether you’re hunting your first Graphorn or optimizing a build around one you’ve already tamed, the principles remain consistent: respect the creature’s damage output, manage distance effectively, and leverage your summon’s abilities strategically. Hogwarts Legacy offers enough depth in its creature systems that dedicated players will continue discovering new techniques and synergies long after acquiring this rarest of beasts.